
Migrating your business email is one of the most high-stakes infrastructure tasks you will ever perform. Done right, your team barely notices the change. Done wrong, emails go missing, clients cannot reach you, and critical data disappears.
This guide gives you a complete, phase-by-phase email migration checklist — covering everything from pre-migration planning and DNS changes to post-migration verification and staff training. Whether you are moving from shared hosting email to Google Workspace, switching from one cPanel server to another, or consolidating multiple accounts into Microsoft 365, this checklist has you covered.
Quick Answer: An email migration is the process of moving email accounts, messages, contacts, and calendar data from one provider or server to another -- while keeping downtime, data loss, and disruption to an absolute minimum.
What Is an Email Migration and Why Does It Matter for Small Businesses?

Email migration means transferring your existing email infrastructure — inboxes, archived messages, contacts, calendar events, and configurations — from your current provider to a new one. For small businesses, this is rarely a purely technical event. It touches every person in your organisation who uses email to communicate with clients, suppliers, and partners.
Poor migrations cause real business damage: lost sales leads, missed invoices, broken client trust, and hours of IT firefighting. A structured checklist removes the guesswork and ensures nothing falls through the cracks.
Common migration scenarios include: moving from shared hosting email to Google Workspace, switching from Microsoft 365 to Zoho Mail, upgrading from a self-hosted VPS to a managed cloud provider, or simply changing web hosting providers when your domain moves.
What Are the Most Common Types of Email Migration?

| Migration Type | Downtime Risk | Complexity | Data Loss Risk | Cost | Best For |
|---|---|---|---|---|---|
| IMAP-to-IMAP Sync | Low | Low | Medium | Free | Gmail → Google WS, Zoho |
| MX Cutover | Medium | Medium | Medium | Free | Most small businesses |
| Third-Party Tool | Low | Low | Low | $5 – $50 | Non-technical teams |
| Manual PST/MBOX Import | Medium | Medium | Medium | Free | Outlook → Google WS |
| Hosting Provider Move | Higher | High | Low | Varies | cPanel → cPanel |
| Professional Migration | Low | Low | Minimal | $200 – $2,000 | Large teams, zero risk |
What Is an IMAP-to-IMAP Migration and When Should You Use It?
What Is an MX Cutover Migration?
When Should You Use a Professional Migration Tool?
Paid tools like BitTitan MigrationWiz, CloudFuze, and SkyKick handle IMAP sync, calendars, contacts, and collaboration data in one dashboard. They are worth the cost for migrations involving 10 or more users or complex data structures.
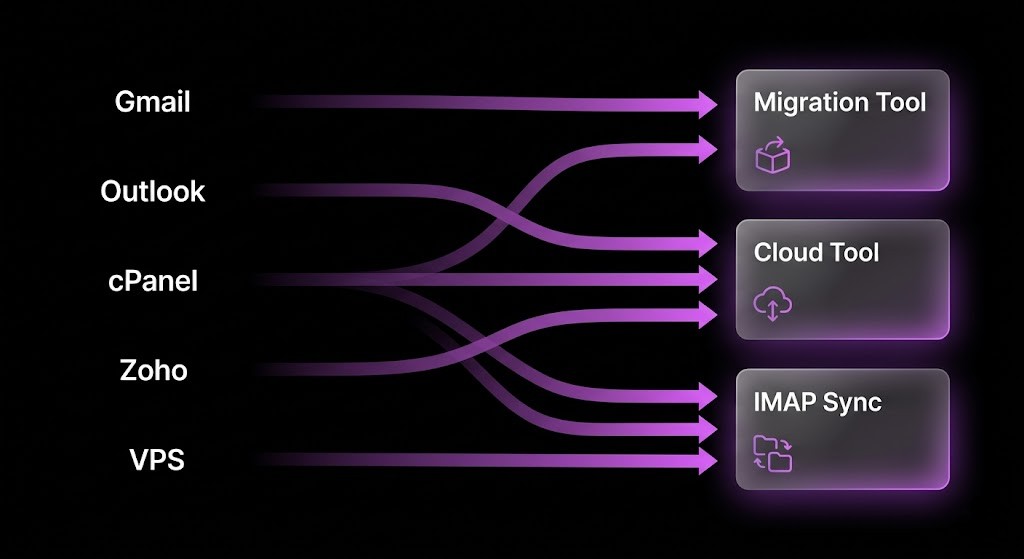
Which Email Migration Tool Should You Use for Your Scenario?

| From Provider | To Provider | Recommended Tool | IMAP Sync? | Difficulty |
|---|---|---|---|---|
| Gmail (free) | Google Workspace | Google WS Migration Tool | Yes | Easy |
| Outlook / M365 | Google Workspace | GAMMO / Cloudfuze | Yes | Medium |
| cPanel Email | Google Workspace | imapsync / Thunderbird | Yes | Medium |
| Yahoo Mail | Zoho Mail | IMAP Sync (built-in) | Yes | Easy |
| Shared Hosting | Microsoft 365 | BitTitan MigrationWiz | Yes | Medium |
| Self-Hosted VPS | Google Workspace | imapsync CLI / Thunderbird | Yes | Advanced |
| Zoho Mail | Microsoft 365 | BitTitan MigrationWiz | Yes | Medium |
| Any Provider | Fastmail | IMAP Import (built-in) | Yes | Easy |
Pro Tip: imapsync is the most powerful open-source migration tool available. It runs from a terminal and supports nearly any IMAP-to-IMAP migration. For non-technical users, Thunderbird offers a free GUI alternative that achieves the same result without the command line.

What Is the Complete Email Migration Checklist for Small Businesses?
PHASE 1 : Pre-Migration Planning -- What Must You Do Before Anything Else?
PHASE 2 :Data Backup - What Must You Back Up Before Migration?
PHASE 3 :New Environment Setup -- How Do You Prepare the New Provider?
PHASE 4 :Email Data Migration -- How Do You Transfer Your Emails Safely?
PHASE 5 :DNS Cutover -- How Do You Switch Your Domain's Email Flow?
PHASE 6 :Post-Migration Verification -- How Do You Confirm Success?
How Do You Migrate Email to Google Workspace Specifically?
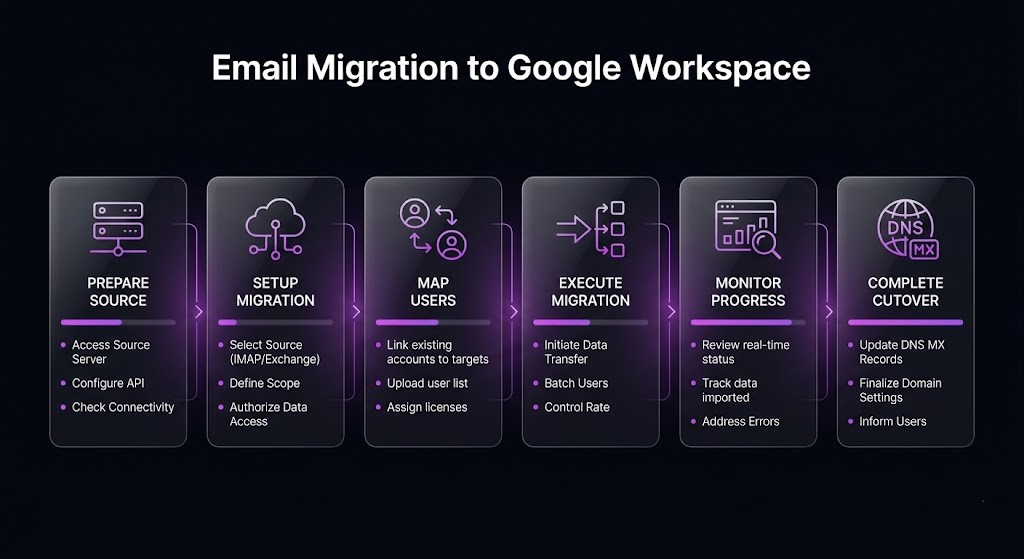
What Is the Google Workspace Migration Tool?
Google Workspace Data Migration Service built into the Admin Console lets you migrate from Gmail, Microsoft Exchange, Lotus Notes, and any IMAP server — all through a simple guided wizard.
- Go to Google Admin Console > Data > Data Migration.
- Select your migration source: Gmail, Exchange, IMAP, or other.
- Enter your source server IMAP settings and admin credentials.
- Choose the date range — migrate all mail or only emails after a specific date.
- Select all users or specific accounts to migrate.
- Click Start and monitor the migration dashboard for progress and errors.
Pro Tip: Use the Google Workspace Admin Console migration tool for clean, wizard-driven migrations of up to 100 users. For larger organisations or complex data including shared calendars, use a paid tool like MigrationWiz or CloudFuze.
How Do You Migrate Email to Microsoft 365?
How Do You Verify Your DKIM Record?
Use MXToolbox DKIM Lookup and enter your domain and selector. A valid result shows “DKIM record found” with the public key details.
Alternatively, send a test email to mail-tester.com which gives you a full deliverability score including DKIM pass/fail status.
How Do You Set Up DMARC — Step by Step?
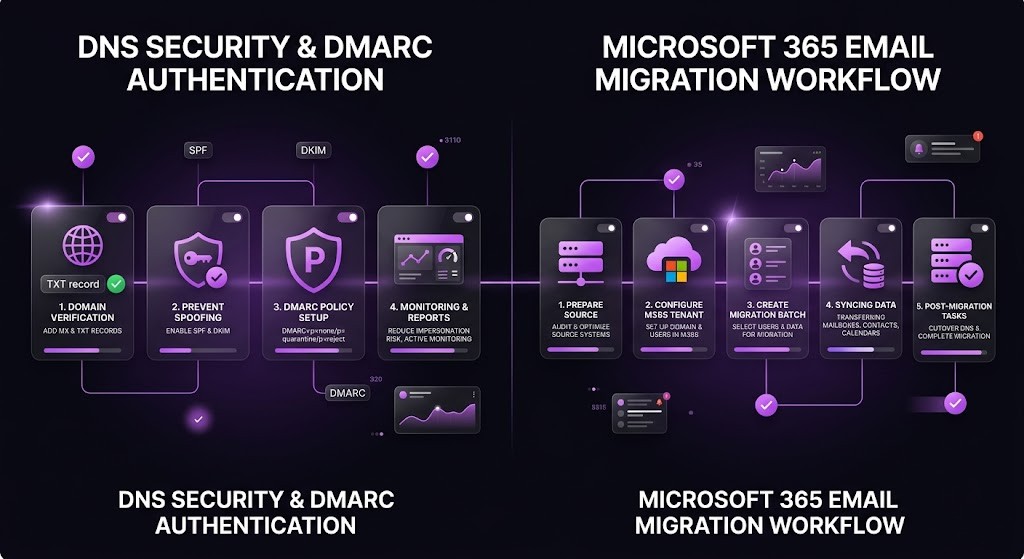
Microsoft 365 supports several migration paths. The most common for small businesses is the IMAP migration wizard available in the Microsoft 365 Admin Center.
How Does the Microsoft 365 IMAP Migration Work?
- Log in to Microsoft 365 Admin Center > Setup > Migration.
- Select IMAP as the migration type and enter your source IMAP server details.
- Upload a CSV file listing the user accounts to migrate (email address, username, password).
- Microsoft syncs all emails from the source IMAP server to the new mailboxes.
- Once sync is complete, update MX records to point to Microsoft 365.
- Complete a final delta sync to capture any mail received during the cutover window.
Warning: Microsoft 365 IMAP migration does not include contacts or calendars. Export contacts as CSV and calendar events as ICS files, then import them separately via Outlook desktop app or the Microsoft 365 admin tools.
How Do You Migrate Email Between cPanel Servers?

What Is the Fastest Way to Migrate Between Two cPanel Servers?
- Log in to WHM on the destination server.
- Go to WHM > Transfers > Transfer or Restore a cPanel Account.
- Enter the source server hostname, root username, and SSH password or key.
- WHM copies all email accounts, inboxes, databases, files, and DNS zones automatically.
- Update the domain’s nameservers or MX records to point to the new server.
- Verify all email accounts are accessible via webmail on the new server.
What If Only One Server Has cPanel?
What Are the Most Common Email Migration Mistakes and How Do You Avoid Them?
- Cancelling old hosting before migration is complete: The single most common catastrophic mistake. Always keep old accounts active for minimum 30 days post-cutover.
- Not backing up before starting: IMAP sync tools are non-destructive, but connectivity issues mid-sync can corrupt partial mailboxes. Always back up first.
- Forgetting to migrate contacts and calendars: IMAP tools only migrate email. Contacts and calendars must be exported and imported separately every time.
- Changing MX records before the new mailboxes are ready: If you update MX records before creating accounts on the new provider, inbound emails bounce immediately.
- Missing third-party senders in SPF: Every service that sends email from your domain must be added to your new SPF record or those emails land in spam.
- Not updating staff email clients: After DNS cutover, users with old IMAP settings see their email stop syncing. Prepare a settings guide before cutover day.
- Migrating during peak business hours: Schedule MX cutover for the lowest-traffic window. Never migrate on a Monday morning, month-end, or before a major client deadline.
- Skipping post-migration deliverability checks: New IP addresses sometimes trigger spam filters. Check mail-tester.com and Google Postmaster Tools within 48 hours.
How Long Does a Small Business Email Migration Take?
| Business Size | Users | Estimated Data | Typical Migration Time |
|---|---|---|---|
| Solo / Freelancer | 1 – 2 | 1 – 5 GB | 2 – 4 hours |
| Micro Business | 3 – 10 | 5 – 25 GB | 4 – 12 hours |
| Small Business | 10 – 30 | 25 – 100 GB | 1 – 3 days |
| Growing SME | 30 – 100 | 100 – 500 GB | 3 – 7 days |
| Complex / Multi-Domain | 100+ | 500+ GB | 1 – 4 weeks |
What Is the Recommended Email Migration Timeline for Small Businesses?

| Phase | Timeline | Action |
|---|---|---|
| Phase 1 | Day 1 – 3 | Publish SPF. Audit all accounts, map dependencies, choose provider, set timeline and notify team. |
| Phase 2 | Day 3 – 5 | Full mailbox backup, export contacts and calendars. Store in two separate locations. |
| Phase 3 | Day 5 – 7 | Set up all accounts, aliases, and SMTP configs on the new provider. Test internal sending. |
| Phase 4 | Week 1 – 2 | IMAP sync all mailboxes, contacts, and calendars. Monitor for errors. Run delta sync. |
| Phase 5 | Week 2 | Lower TTL. Update MX, SPF, DKIM, and DMARC. Verify propagation. Send test emails. |
| Phase 6 | Week 2 – 6 | Monitor deliverability. Configure all clients. Keep old server live for 30 days minimum. |
What Should You Do If Something Goes Wrong During Migration?

What If Emails Are Bouncing After the MX Cutover?
- Check that the new MX records have propagated fully using MXToolbox.
- Verify the recipient account exists on the new server — check for typos in the email address.
- Confirm the new server is accepting connections on port 25 (inbound SMTP).
- Check whether the new server IP is on any spam blocklists using the MXToolbox Blacklist Check.
What If Emails Are Missing After Migration?
- Run a second IMAP sync using imapsync or Thunderbird to catch any missed messages.
- Check the IMAP sync log for errors relating to specific folders or date ranges.
- Confirm the old server is still accessible and the original emails are present.
- Restore from your MBOX or PST backup as a last resort using your email client’s import function.
What If Staff Cannot Access Email After Migration?
- Confirm the user account exists and the password is correct on the new provider.
- Verify IMAP and SMTP settings match the new provider’s documentation exactly — check port numbers and SSL.
- Clear the email client’s cached account settings and re-add the account from scratch.
- Test via webmail first — if webmail works but the desktop client does not, the issue is client configuration.
Ready to Start Your Email Migration? Here Is Your Action Plan.
A successful email migration does not happen by accident. It requires a clear plan, a full backup, a staged cutover, and at least 30 days of running both old and new environments in parallel.
Use this six-phase checklist as your master reference. Print it, share it with your team, and check off each item as you go.
- Phase 1 – Plan: Audit accounts, map dependencies, choose provider, set timeline.
- Phase 2 – Back up: Full mailbox export, contacts, calendars stored in two locations.
- Phase 3 – Set up: Create all accounts, aliases, and SMTP configs on the new provider.
- Phase 4 – Migrate: IMAP sync all mailboxes, contacts, and calendars. Run delta sync.
- Phase 5 – Cutover: Update MX, SPF, DKIM, and DMARC records. Verify propagation.
- Phase 6 – Verify: Monitor deliverability, configure clients, keep old server live for 30 days.
Planning an Email Migration for Your Business?
We handle end-to-end email migrations for small businesses — from shared hosting to Google Workspace, Microsoft 365, Zoho, or self-hosted VPS setups. We manage the planning, backup, IMAP sync, DNS cutover, staff onboarding, and post-migration monitoring so your team stays connected throughout.
Frequently Asked Questions (FAQs)
Will I lose any emails during migration?
If you follow the checklist — especially Phase 2 (full backup) and Phase 4 (IMAP sync before MX cutover) — the risk of email loss is extremely low. IMAP sync tools copy emails without deleting the originals, and a delta sync captures any new messages received during the migration window. The only scenario that causes genuine data loss is cancelling old hosting before migration is complete.
How do I migrate email without downtime?
Perform the full IMAP sync first, then run a final delta sync immediately before updating MX records. With a pre-lowered TTL of 300 seconds, MX propagation takes 5 to 15 minutes. During that window some emails may arrive at the old server — which is why you keep it active and forward stragglers to the new provider.
Do I need to tell my contacts about the migration?
No — if your email address stays the same (you@yourdomain.com), your contacts will not notice any change. The migration only changes the back-end infrastructure. If you are changing your email address as part of the migration, send an address-change notification and set up forwarding from the old address.
Can I migrate email myself or do I need a professional?
For 1 to 10 users, self-service migration using your new provider’s built-in tools is achievable with a structured checklist. For 10+ users, complex data (shared calendars, CRM integrations), or mission-critical environments with zero tolerance for downtime, a professional migration service is worth the investment.
How much does a professional email migration cost?
DIY migration using free tools costs nothing beyond your time. Paid tools like BitTitan MigrationWiz cost $10 to $25 per mailbox. Professional migration services typically range from $200 for a 1 to 5 user project to $2,000 or more for a 50-user engagement. The cost is almost always justified by avoiding even a single day of email downtime.
What happens to my email aliases and shared inboxes during migration?
Email aliases and shared inboxes are routing configurations, not mailboxes with stored emails. They do not need to be IMAP-synced. However, you must manually recreate each alias, group, and shared inbox on the new provider before the MX cutover. Failure to do so means emails sent to those addresses will bounce after DNS is updated.
How do I keep my old emails after switching providers?
Your historical emails migrate to the new provider via IMAP sync. A complete sync before MX cutover ensures all emails from the old server exist in the new mailboxes. Additionally, keep a local MBOX or PST backup as a permanent archive. Most providers also allow you to import MBOX or PST files directly at any time.