
If your emails are ending up in spam — or worse, being used to impersonate your brand — there is a very good chance that SPF, DKIM, or DMARC is either missing or misconfigured on your domain.
These three DNS-based protocols form the backbone of modern email authentication. Together, they tell the world’s mail servers: “This email is genuinely from us, was not tampered with in transit, and here is what to do if it fails verification.”
This guide explains exactly what each protocol does, how to configure each one step by step, and how to verify that everything is working correctly — whether you use Google Workspace, Microsoft 365, cPanel, or a self-hosted mail server.
Quick Answer: SPF tells receiving servers which IP addresses are allowed to send email for your domain. DKIM adds a cryptographic signature that proves the email was not altered. DMARC ties them together and tells servers what to do when either check fails.
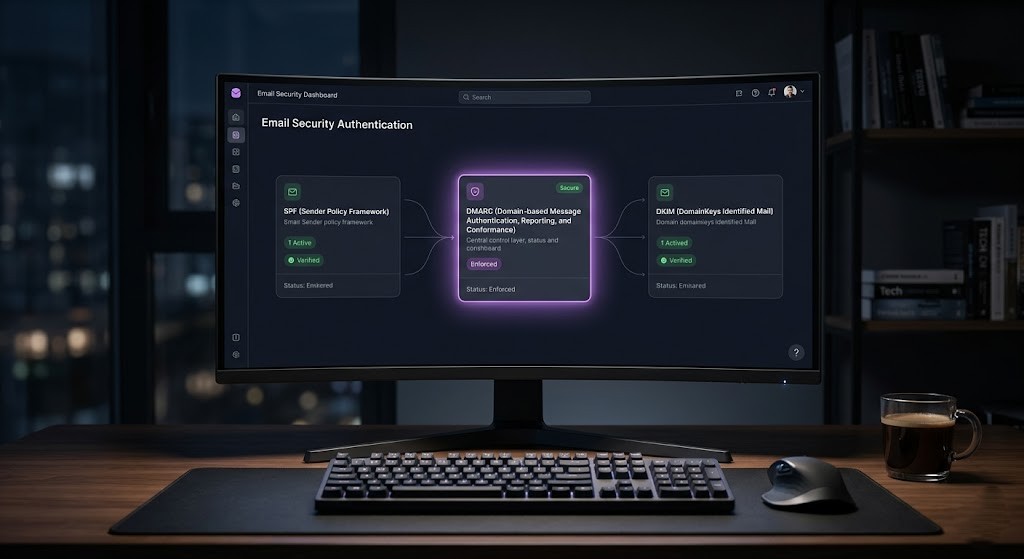
What Are SPF, DKIM, and DMARC — and Why Do They Matter?

email actually came from the domain in the From address?” Without authentication records, anyone can send an email claiming to be from your domain — a technique used in phishing, business email compromise (BEC), and spam campaigns.
The three protocols each answer a different part of that trust question:
- SPF (Sender Policy Framework): Published as a DNS TXT record, SPF lists the mail servers authorised to send email on behalf of your domain. If a message arrives from an unlisted server, it fails SPF.
- DKIM (DomainKeys Identified Mail): DKIM adds a digital signature to every outgoing email using a private key held by your mail server. The receiving server fetches your public key from DNS and verifies the signature. Tampered emails will fail.
- DMARC (Domain-based Message Authentication, Reporting & Conformance): DMARC is the enforcement layer. It requires that at least one of SPF or DKIM aligns with the From: domain — and tells receiving servers whether to quarantine or reject messages that fail.
Without all three working together, your domain is vulnerable to spoofing, your emails land in spam more often, and you have no visibility into who is sending mail on your behalf.
According to Google’s Postmaster Tools documentation, domains without DMARC are significantly more likely to have their emails rejected or filtered by Gmail — especially since Google began enforcing authentication for bulk senders in 2024.
How Do SPF, DKIM, and DMARC Compare to Each Other?
Before diving into setup, here is a clear side-by-side breakdown of what each protocol does and how they interact:
| Feature | SPF | DKIM | DMARC ⭐ |
|---|---|---|---|
| What it does | Authorises sending servers | Adds a cryptographic signature | Enforces SPF + DKIM policy |
| DNS record type | TXT | TXT | TXT |
| Protects against | Spoofed sending IPs | Tampered message content | Phishing & impersonation |
| Survives email forwarding? | No ❌ | Yes ✅ | Depends on alignment |
| Visibility to recipient? | No (backend only) | No (backend only) | Yes (reports sent to owner) |
| Required for DMARC? | Yes ✅ | Yes ✅ | N/A |
| Setup difficulty | Easy | Moderate | Moderate–Advanced |
| Can work standalone? | Yes (limited) | Yes (limited) | No — needs SPF + DKIM |
What Do You Need Before You Start Setting Up Email Authentication?

Before making any DNS changes, gather the following:
- Access to your domain’s DNS settings: This is usually through your domain registrar (Namecheap, GoDaddy, Cloudflare DNS, Route 53). If your DNS is managed by your hosting provider, you will need access to cPanel, Plesk, or hPanel.
- Your email provider’s documentation: Google Workspace, Microsoft 365, Zoho, and others publish their own specific SPF includes and DKIM public keys. Always use the values your provider gives you — do not guess.
- A DNS propagation checker: Changes can take up to 48 hours to propagate. Tools like MXToolbox and DNSChecker.org let you verify your records in real time.
- A DMARC report inbox: DMARC sends aggregate XML reports to an email address you specify. Create a dedicated inbox (e.g., dmarc-reports@yourdomain.com) or use a free tool like Postmark’s DMARC analyser.

How Do You Set Up SPF — Step by Step?

What Does an SPF Record Look Like?
What Do the SPF Mechanisms Mean?
- include: Authorises another domain’s SPF record (e.g., include:_spf.google.com delegates to Google’s list of IPs).
- ip4: / ip6: Directly authorises a specific IP address or CIDR range (e.g., ip4:203.0.113.5).
- a: Authorises the IP address of your domain’s A record (useful if your web server also sends email).
- mx: Authorises the mail servers listed in your MX records.
- ~all (Softfail): Unauthorised servers are marked as suspicious but still delivered — recommended while testing.
- -all (Hard fail): Unauthorised servers are rejected outright — use once you are confident your record is complete.
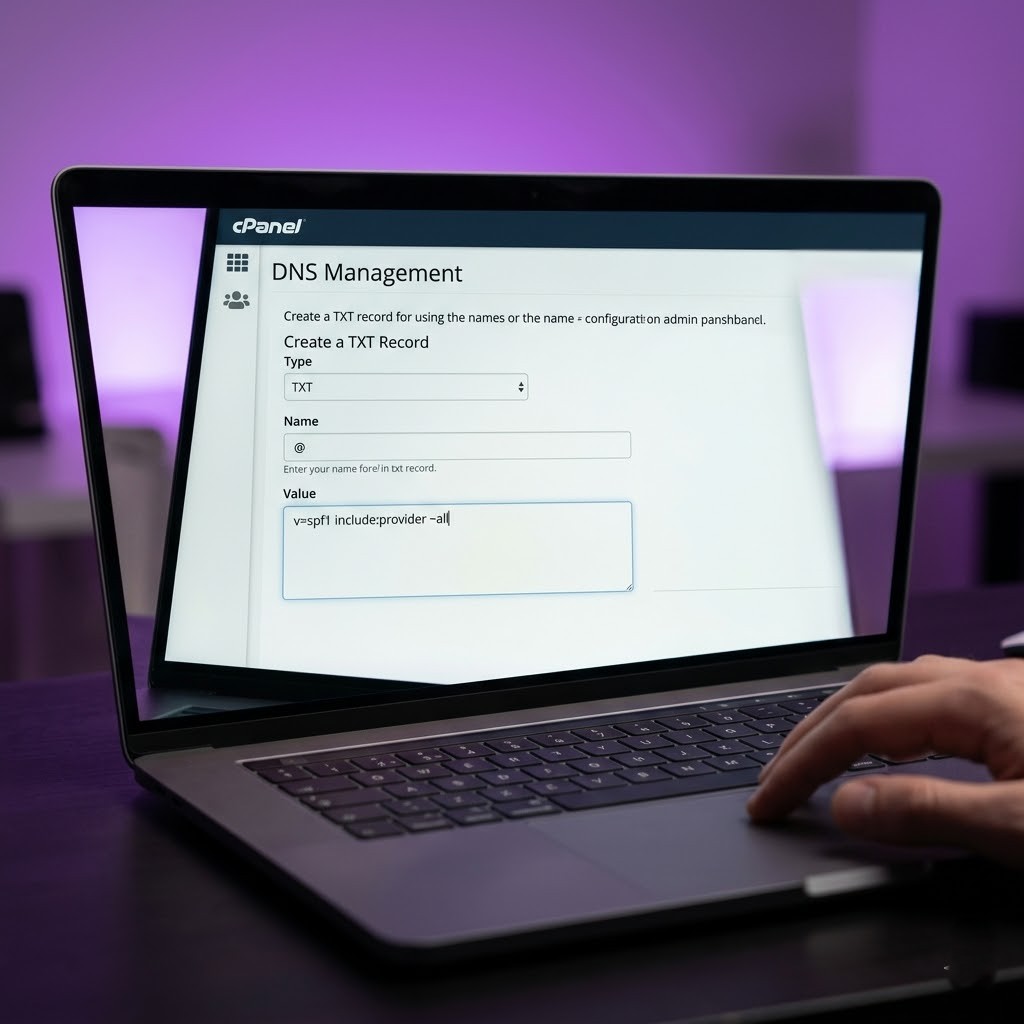
Create Your SPF TXT Record
- Log in to your domain’s DNS management panel.
- Create a new TXT record with the following values:
- Name / Host: @ (or leave blank — this means your root domain)
- Value: v=spf1 include:[your-provider] ~all
- TTL: 3600 (1 hour) is standard
- Save the record and wait for DNS propagation.
Best Practice: Only ever have ONE SPF TXT record on your domain. Multiple SPF records cause a PermError which means SPF fails completely. If you use multiple email services, combine them into one record with multiple include: statements.
How Do You Verify Your SPF Record Is Working?
Use MXToolbox SPF Lookup or Google’s Check MX tool to verify your SPF record after DNS propagation.
- A result of “SPF record found” with no errors means it is publishing correctly.
- A “PermError: too many DNS lookups” means your include: chain exceeds 10 DNS queries — the most common SPF failure.
How Do You Set Up DKIM — Step by Step?

DKIM requires generating a public/private key pair. Your mail server signs outgoing emails with the private key. You publish the public key as a DNS TXT record so that receiving servers can verify the signature.
How Does DKIM Work Technically?
What Is a DKIM Selector?
Generate and Publish Your DKIM Key

How to Set Up DKIM for Google Workspace?
- Go to Google Admin Console → Apps → Google Workspace → Gmail → Authenticate Email.
- Select your domain and click Generate New Record.
- Google will show you a DNS TXT record with a selector (e.g., google._domainkey.yourdomain.com) and a long public key value.
- Copy the TXT record value and add it to your DNS. The Host field should be: google._domainkey
- Return to Admin Console and click Start Authentication once DNS has propagated.
How to Set Up DKIM for Microsoft 365?
- Navigate to Microsoft Defender Portal → Email & Collaboration → Policies & Rules → Threat Policies → Email Authentication → DKIM.
- Select your domain and enable DKIM signing.
- Microsoft will display two CNAME records (selector1 and selector2) to add to your DNS.
- Add both CNAME records to DNS, then return to the portal and click Enable.
How to Set Up DKIM for cPanel / Self-Hosted?
- Log in to cPanel → Email → Email Deliverability.
- Click Manage next to your domain.
- cPanel auto-generates a DKIM key pair. Click Install Suggested Record to publish the public key.
- For FastPanel or Mailcow, navigate to the domain’s mail settings — DKIM key generation is built into both panels.
How Do You Verify Your DKIM Record?
Use MXToolbox DKIM Lookup and enter your domain and selector. A valid result shows “DKIM record found” with the public key details.
Alternatively, send a test email to mail-tester.com which gives you a full deliverability score including DKIM pass/fail status.
How Do You Set Up DMARC — Step by Step?

DMARC is the enforcement and reporting layer. It builds on SPF and DKIM, so both must be passing before DMARC adds meaningful value. DMARC is a single TXT record published at _dmarc.yourdomain.com.
What Are the DMARC Policy Options?
| Policy (p=) | Action on Failure | Use Case | Risk Level |
|---|---|---|---|
| none | Deliver as normal; send reports only | Initial monitoring phase | 🟢 Safe to start |
| quarantine | Send to spam/junk folder | Testing enforcement | 🟡 Moderate |
| reject | Block the email entirely | Full protection mode | 🔴 Production-ready |
What Does a DMARC Record Look Like?
What Do the DMARC Tags Mean?
v=DMARC1 — Required. Identifies the record as a DMARC policy.
p= — Policy to apply (none, quarantine, reject).
rua= — Email address for aggregate reports (XML summaries of all mail activity).
ruf= — Email address for forensic reports (copies of failing messages — use cautiously).
pct= — Percentage of failing messages the policy applies to. Start at pct=10 when testing quarantine/reject.
adkim= — DKIM alignment mode. r (relaxed, default) or s (strict — From domain must match exactly).
aspf= — SPF alignment mode. r (relaxed, default) or s (strict).
sp= — Policy for subdomains. Useful if you want stricter rules for subdomains independently.
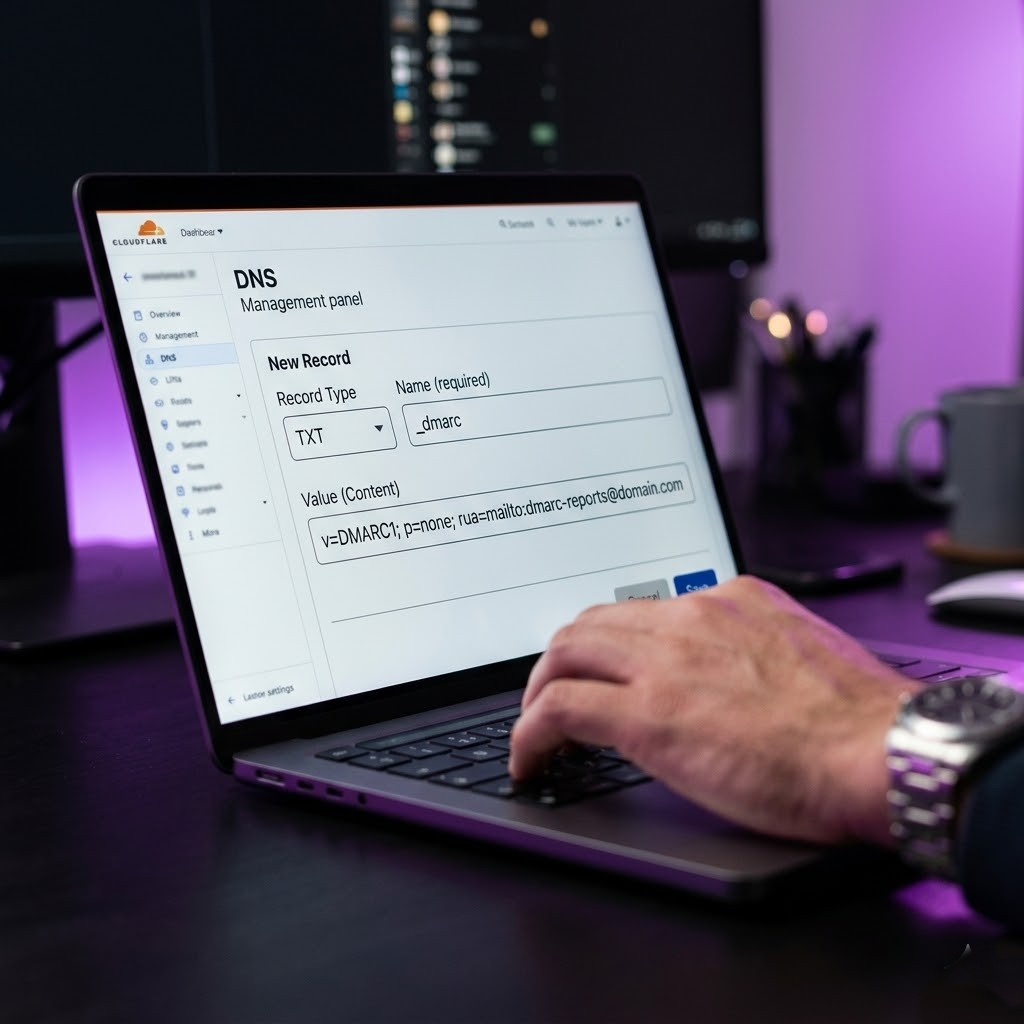
Publish Your DMARC TXT Record
- Log in to your DNS management panel.
- Create a new TXT record with Name/Host: _dmarc
- Set the Value to your chosen DMARC policy (start with p=none).
- Set TTL to 3600.
- Save and wait for DNS propagation.
Best Practice: Start with p=none and an rua= reporting address for at least 2–4 weeks before moving to quarantine. Review the aggregate reports to identify all legitimate sources of email for your domain — including CRMs, marketing tools, helpdesks, and ticketing systems.
How Do You Verify All Three Records Are Working Together?

Which Tools Can You Use to Test Email Authentication?
- MXToolbox Email Header Analyser — Paste raw email headers for a full authentication breakdown.
- Google’s Check MX Tool — Checks SPF, DKIM, and DMARC for Google Workspace senders.
- mail-tester.com — Send a test email and receive a deliverability score out of 10.
- DMARC Analyser (Postmark) — Free DMARC report parsing and visualisation.
- EasyDMARC — Comprehensive monitoring, report parsing, and DMARC record builder.
What Are the Most Common SPF, DKIM, and DMARC Mistakes?
| Problem | Likely Cause | Fix |
|---|---|---|
| Emails going to spam despite SPF | SPF record has too many DNS lookups (>10) | Flatten SPF or use an SPF flattening service |
| DKIM signature fails on forwarded email | Forwarding rewrites headers, breaking signature | Use DMARC p=none + monitor; SPF is the main check for forwarded mail |
| DMARC reports show unknown senders | Third-party services (CRM, helpdesk) not added to SPF | Add all sending services to SPF and configure their DKIM |
| Multiple SPF records causing failure | Domain has two separate TXT SPF records | Merge into a single SPF TXT record |
| DMARC alignment failure despite passing SPF | Return-path domain differs from From: domain | Ensure your From: domain matches your SPF authorized domain |
| SPF PermError: too many DNS lookups | include: chains exceed 10 DNS lookups | Remove unused includes; use ip4:/ip6: directly where possible |
How Does DMARC Work With Third-Party Email Services?
Most businesses use multiple services that send email on their behalf — marketing platforms (Mailchimp, HubSpot), CRMs (Salesforce, Pipedrive), helpdesks (Freshdesk, Zendesk), and transactional email APIs (SendGrid, Mailgun).
Every one of these services must be authorised in your SPF record and/or configured with their own DKIM signing using your domain. If they are not, they will fail DMARC alignment and your emails from those services will be quarantined or rejected once you enforce DMARC.
How Do You Add Third-Party Services to Your SPF Record?
# Common SPF Includes (Popular Services) Mailchimp: include:servers.mcsv.net SendGrid: include:sendgrid.net Mailgun: include:mailgun.org HubSpot: include:_spf.hubspot.com Zendesk: include:mail.zendesk.com Salesforce: include:_spf.salesforce.com Amazon SES: include:amazonses.com
What Is DKIM Alignment and Why Does It Matter for Third-Party Senders?
DMARC alignment means the domain in the DKIM signature (d= tag) must match the From: domain in the email header. Some third-party senders sign emails with their own domain (e.g., d=mailchimp.com) by default — this will fail DMARC alignment even if DKIM passes.
To fix this, enable custom domain DKIM signing in each third-party platform. Most services allow you to add a CNAME record to your DNS that delegates DKIM signing for your domain to their infrastructure.
What Is the Recommended Rollout Timeline for SPF, DKIM, and DMARC?

| Phase | Timeline | Action |
|---|---|---|
| Phase 1 | Day 1–3 | Publish SPF record. Verify with MXToolbox. Test by sending emails and checking headers. |
| Phase 2 | Day 3–7 | Enable DKIM in your email provider. Publish the public key to DNS. Send test emails and confirm dkim=pass. |
| Phase 3 | Week 1–2 | Publish DMARC with p=none and rua= reporting. Begin collecting aggregate reports. |
| Phase 4 | Week 2–6 | Analyse reports. Identify and authorise all third-party senders. Fix SPF and DKIM for any failing services. |
| Phase 5 | Week 6–8 | Move DMARC to p=quarantine; pct=10. Gradually increase pct over two weeks while monitoring reports. |
| Phase 6 | Month 2+ | Set DMARC to p=reject. Your domain is now fully protected against spoofing and impersonation. |
What Are the SPF, DKIM, and DMARC Requirements for Gmail and Microsoft in 2025?
In February 2024, Google and Yahoo/Microsoft both rolled out stricter authentication requirements that affect all bulk email senders (those sending more than 5,000 emails/day to Gmail addresses):
- SPF or DKIM required: At least one must pass for any email to be delivered reliably.
- DMARC required for bulk senders: p=none is sufficient to start, but a DMARC record must exist.
- One-click unsubscribe: Required for marketing email — not directly related to authentication but part of Google’s 2024 sender requirements.
- Spam rate below 0.1%: Monitored via Google Postmaster Tools. Persistent high spam rates lead to delivery failures.
How Do You Set Up SPF and DKIM on cPanel, Plesk, and FastPanel?

How to Enable Email Authentication in cPanel?
- Log in to cPanel → Email → Email Deliverability.
- Your domains are listed with a status indicator.
- Click Manage next to any domain showing as “Invalid” or “Not Configured”.
- Click Repair or Install Suggested Record next to the SPF and DKIM sections.
- cPanel automatically generates and publishes the correct DNS records if your nameservers are pointed to cPanel’s DNS.
How to Enable Email Authentication in Plesk?
- Log in to Plesk → Websites & Domains → select your domain → Mail Settings.
- Check the boxes for “Enable SPF spam protection” and “Enable DKIM email signing”.
- Plesk auto-generates the DKIM key and publishes it. If DNS is external, it shows you the TXT record to add manually.
How to Enable Email Authentication in FastPanel?
- Log in to FastPanel → Domains → select your domain → DNS Records.
- FastPanel includes a mail server stack (Postfix + Dovecot + OpenDKIM). Navigate to Mail → DKIM Settings.
- Generate a new DKIM key pair. Copy the public key DNS record.
- Add the TXT record manually if your DNS is external, or let FastPanel apply it if DNS is managed internally.
- Add your SPF record manually in the DNS Records section.
Ready to Protect Your Domain With SPF, DKIM, and DMARC?
Setting up SPF, DKIM, and DMARC is one of the highest-leverage technical improvements you can make to your email infrastructure. It protects your brand from being impersonated, improves deliverability to Gmail and Outlook, and gives you visibility into every server sending mail on your behalf.
Here is the quick-start checklist to take action today:
- ✅ Step 1: Add a single SPF TXT record at @ including all your email providers.
- ✅ Step 2: Enable DKIM in your email provider’s admin panel and publish the public key to DNS.
- ✅ Step 3: Publish DMARC with p=none and an rua= reporting address.
- ✅ Step 4: Monitor aggregate reports for 4–6 weeks using DMARC Analyser or EasyDMARC.
- ✅ Step 5: Authorise all third-party senders in SPF and DKIM, then escalate DMARC to p=reject.
Not Sure If Your Domain Is Properly Authenticated?
We audit, configure, and validate SPF, DKIM, and DMARC for businesses using Google Workspace, Microsoft 365, cPanel, or self-hosted VPS mail servers. We also handle third-party sender alignment for CRMs, helpdesks, and marketing platforms.
Frequently Asked Questions (FAQs)
Do I need all three — SPF, DKIM, and DMARC — or just one?
You need all three for complete protection and optimal deliverability. SPF alone cannot prevent spoofing of the visible From: address. DKIM alone cannot prevent forged sender domains. DMARC is what enforces both checks and prevents impersonation — but it depends entirely on SPF and DKIM being correctly configured first.
Can I set up SPF, DKIM, and DMARC for free?
Yes. All three are DNS records that you publish yourself — there is no cost to the protocols themselves. However, if you want advanced DMARC report analysis and monitoring, paid tools like EasyDMARC (from ~$7/month) or Valimail save significant time by parsing the XML reports and showing you actionable data in a dashboard.
Why is my SPF record failing even though I set it up correctly?
The most common cause is exceeding the 10 DNS lookup limit. Every include: in your SPF record triggers additional DNS lookups, and include: chains can stack up quickly if you use many third-party senders. Use an SPF flattening tool to resolve includes into raw IP addresses and reduce lookup counts.
Will setting DMARC to p=reject break any of my emails?
It can — and that is exactly why you should monitor with p=none first. Emails from services you have not added to SPF, or that sign DKIM with their own domain instead of yours, will be rejected. Always audit your DMARC aggregate reports for 4–6 weeks before moving to p=reject to ensure all legitimate senders are authorised.
How long does it take for SPF, DKIM, and DMARC to take effect?
DNS propagation typically takes between 15 minutes and 48 hours, depending on your DNS provider’s TTL settings and the global propagation speed. Once propagated, the records take effect immediately on the next email sent. You can use DNSChecker.org to monitor propagation progress across different global DNS servers.
What happens if I have multiple email providers for the same domain?
You must include all of them in a single SPF record (never create two SPF records — that causes PermError). Each provider must also be configured with DKIM using your domain. DMARC will then align whichever check passes. This is common when using Google Workspace for internal email and SendGrid for transactional email — both can coexist correctly.
Does SPF, DKIM, and DMARC affect cold outreach or sales emails?
Yes, significantly. Prospects using Gmail or Outlook will have their mail servers verify your authentication records before delivering your message. Without proper SPF, DKIM, and DMARC, even well-written cold emails land in spam or are silently rejected. Correct authentication is now table stakes for any outbound sales or marketing programme.